Ohhh no. Another Power BI feature that requires Premium. I know this feeling. A lot of small and medium sized companies don’t have Premium – they simply can’t afford it. With less than 500 users the business case is still favoring Pro licenses. What to do, if you want to use a Premium feature like the XMLA endpoint?
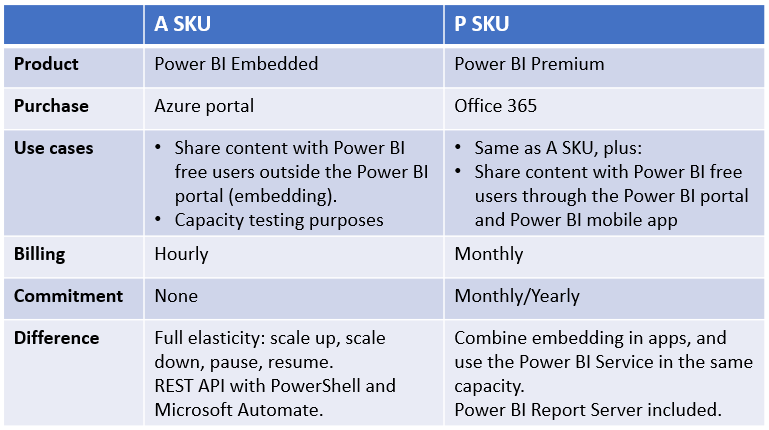
The answer is pretty simple. You create a Power BI Embedded capacity in the Azure Portal. The name is quite confusing, as it’s simply dedicated capacity – the same you get, when you buy Power BI Premium from the Office 365 Portal. The only “downside” of the Power BI Embedded capacity is, that your free report consumers don’t get access to the Power BI Portal or Power BI mobile app. Not a problem when using the XMLA endpoint.
The “upside” is a much lower entry point and you only pay by the hour. You have full elasticity – scale up/down and pause/resume. AND you have an API, so that you can automate administration of the capacity – more on that later. The cheapest Power BI embedded capacity is the A1 that cost $1 per/hour. For that price you get 3GB memory, witch in many cases it’s more than enough. If you need the equivalent of an Power BI Premium P1 (25GB) then you should get the A4 that cost $8 per/hour.
An important remark: You only need the capacity running when you use the XMLA endpoint. Might just be a couple of hours every month, when you do your deployments or debugging.
Creating af Power BI Embedded capacity
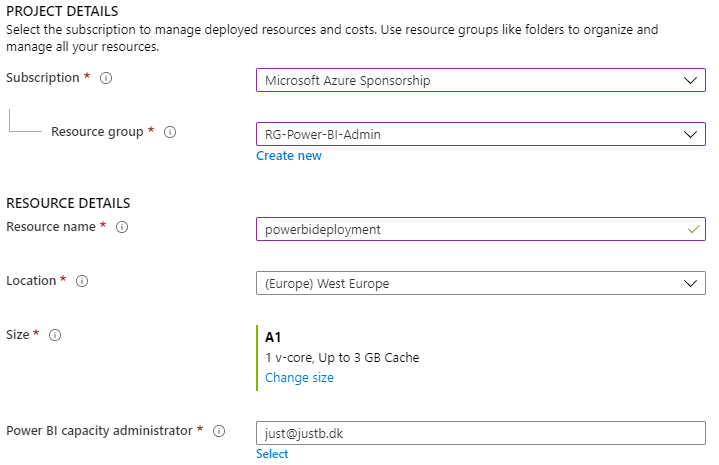
Go to the Azure Portal and create a Power BI Embedding capacity. You can get a free account with $200 to start your journey in Azure = 200 hours of A1 capacity.
Be sure to pick the same location as your Power BI Service. Unsure? Then go to the Power BI Service and click on Help & Support (?) and then “About Power BI”. Here you can see where your data is stored.
Also be sure that the “Power BI capacity administrator” is also the account you use in the Power BI Service. You can add more administrators later if you also will let co-workers use the capacity.
Create the resource and wait a few minutes while Microsoft allocate and deploy your capacity in their massive Azure data center. I always find this so fascinating. Click, click, click and I have access to a new service!
Now it’s time to go to the Power BI Admin Portal – more specific the Capacity setting and then choose “Power BI embedded” in the top. If you log in with the same account, you should see your capacity showing up.
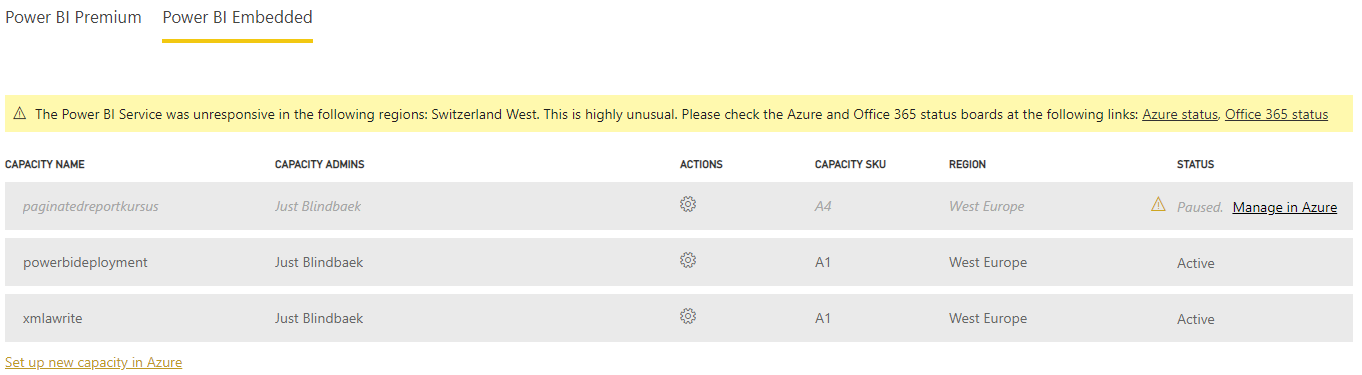
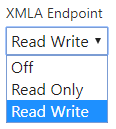
I have access to three different capacities where one is paused – meaning I don’t pay for it. Click on the name of the capacity to manage the settings. Go to the “Workloads” and change XMLA Endpoint to “Read Write”. If you get an error, then disable dataflows and try again. It’s a bug – fix is underway. The change enables the capacity to host data models in the new enhanced metadata format – datasets at the 1500 and higher compatibility level.
Then assign a workspace to the capacity. Either directly from the capacity settings or from the settings on the workspace. If you do it from the workspace, you can copy the connection string. Otherwise it’s in this format: powerbi://api.powerbi.com/v1.0/myorg/[workspace name].
Connect to the workspace with Tabular Editor
Go ahead and publish a Power BI dataset (data model) from Power BI Desktop. Beforehand you should enable “Store datasets using enhanced metadata format” preview feature in Power BI Desktop, so that the dataset is upgraded to compatibility level 1520.
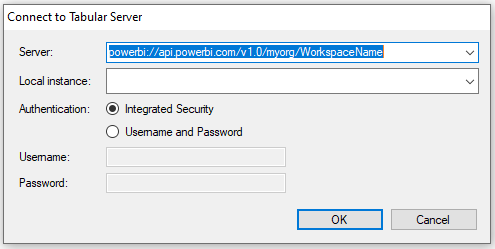
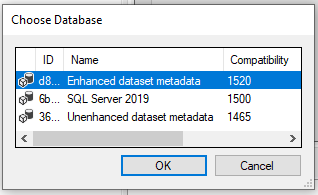
Then grab Tabular Editor and connect to the Workspace. Use the “Open from DB…” option or simply press Ctrl+Shift+O. You will then get the “Connect to Tabular Server” dialog where you put in the connectionstring as the server and then choose your “Database” (dataset).
You can now use all the productivity features in Tabular Editor, the Best Practice Analyzer, Advanced Scripting or even add Calculation Groups, Translations or Perspectives. Pressing “Save” (Ctrl+S) saves the changes directly back to the data model in the workspace!
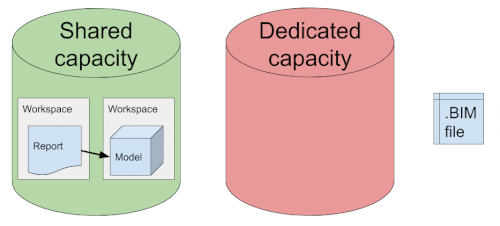
You can also save the data model to a bim-file or a folder structure and make a more formal deployment process. Creating multiple workspaces to represent different environments is a good practice. And then your ready to automate the deployment 🙂
Automating deployment, resuming and pausing the capacity
To save some money, you only want the capacity turned on when you need it. In this example – only when using the XMLA endpoint to deploy a model. The process can be either manual, semi automated or fully automated. These are the steps:
- Turn on (resume) a A-sku capacity
- Move workspace to the dedicated capacity
- Deploy your model using the XMLA write endpoint
- Move workspace back to shared capacity
- Turn of (pause) the A-sku capacity
Step 1, 2, 4 and 5 can be automated with these two Power BI REST API’s:
- Capacity: https://docs.microsoft.com/en-us/rest/api/power-bi-embedded/capacities
- Workspace: https://docs.microsoft.com/en-us/rest/api/power-bi/capacities/groups_assigntocapacity
You want to assign and unassign the workspace from the dedicated capacity, because otherwise it won’t be accessible when the capacity is turned off. Under the hood Microsoft is moving your dataset between different servers, meaning it will be offline for some short time depending on the sizes of your data model(s). Therefore you want to do this process out of office hours – especially if you have a lot of users/reports querying the dataset.
Matt Allington from Excelerator BI has a great article describing the steps using Microsoft Flow. The article focus on embedding reports in SharePoint, but the step around resume/stop capacity and assign/unassign from workspace is completely the same and should give you a good understanding of how to set it up. The article also walk you through how to create an Azure AD App and assign the appropriate security – a requirement to work with the REST API’s. Microsoft have a slightly easier way to register an app in this article: https://docs.microsoft.com/en-us/power-bi/developer/embedded/register-app
Automating step 3 is all about using the XMLA write endpoint, where you can use either Tabular Editor or Analysis Services Deployment Wizard. Both can be run from the command prompt and be part of a bigger deployment pipeline, where you also include the other four steps. The prefered tool from Microsoft is Azure DevOps, but you can also do it with a Powershell script. Daniel Otykier have a comprehensive article series on Analysis Services DevOps with Tabular Editor. You can follow the guide and just change your connectionstring to the Power BI XMLA endpoint 🙂

Be aware that its not yet supported to connect using a service principal and you therefore cannot use the Azure AD application your using with the REST API’s. But you can use an ordinary AAD account without MFA and it don’t need a Power BI Pro license. The user should be contributor or admin on the workspace.
You can now also watch Daniel use azure dev ops to deploy a tabular model using tabular editor: https://youtu.be/fzZgXe3MjhI
Thanks for the great article.
I was wondering if the steps to add and remove workspaces to and from dedicated capacity is really needed or if the capacity can just be paused in the Azure Portal?
I haven’t really found any information on that topic online. Thanks.
You can for sure, just pause the capacity. But then your consumers can see the reports… The content is placed on a server that is shutdown!
Does this still work? I am trying to connect through DAXStudio and it keeps returning bad request
Pingback: Power BI Meets Programmability – TOM, XMLA, and C# – Data on Wheels – Steve & Kristyna Hughes
As this approach is a technical possibly solution, it doesn’t mean you’re allowed to go this way. From a licensing point of view always keep in mind: Just because it’s doable doesn’t mean it’s allowed. At the end if you wish to use Premium Features, which you clearly do with this approach, you have to be licensed properly. Check with your Microsoft representative if this is allowed.
And today you will probably use a Power BI Premium Per User to do the trick. At the time of writing this blog post the Premium Per User license was not available.